Implementing OAuth with NextJs, NextAuth, and Entrypage.io
In this tutorial we will create a NextJs app and connect it to Entrypage.io with the help of the NextAuth library.
Create Next App
The quickest way to create a new Next.js app is using create-next-app, which sets up everything automatically for you. To create a project and add the NextAuth library, run:
# make sure to pick the App Router if you want to follow along
npx create-next-app@latest my-entrypage-demo
cd my-entrypage-demo
pnpm add next-auth
After a series of prompts (be sure to select the default App Router) create-next-app will create a folder with your projectname, install dependencies and add NextAuth.
The route to handle the auth
Create a route for NextAuth to handle our callbacks etc. This file has all our configuration, but relies on a couple of environment settings for the Entrypage.io client configuration.
Create the file /app/api/auth/[…nextauth]/route.ts with this contents:
import NextAuth from "next-auth"

const handler = NextAuth({
  providers: [
    {
      id: "entrypage",
      name: "Entrypage.io",
      issuer: process.env.OAUTH_ISSUER,
      type: "oauth",
      clientId: process.env.OAUTH_CLIENT_ID,
      clientSecret: process.env.OAUTH_CLIENT_SECRET,
      wellKnown: process.env.OAUTH_WELL_KNOWN,
      idToken: true,
      checks: ["pkce","state"],
      authorization: {
        params: {
          scope: "openid profile",
        }
      },
      profile(profile) {
        return {
          id: profile.sub,
          name: profile.name
        }
      }
    }
  ]
})

export { handler as GET, handler as POST }
Environment file
Create a .env.local file in the root of the project.
NEXTAUTH_URL=https://localhost:3000
NEXTAUTH_SECRET=some_super_secret
# Replace with your actual values
OAUTH_CLIENT_ID=<client id goes here>
OAUTH_CLIENT_SECRET=<client secret goes here>
OAUTH_ISSUER=<your entrypage.io Realm Uri>
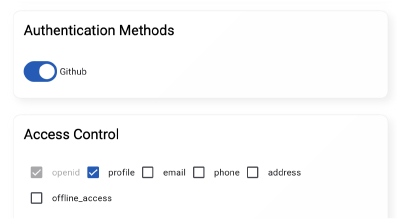
OAUTH_WELL_KNOWN=<your entrpyage.io Realm Uri>/.well-known/openid-configurationIn this file we need to replace a couple of placeholders with the actual values. In this demo we will setup a confidential client with GitHub as external identity provider, but the proces is the same for all supported providers.
Our Client configuration
Navigate to your Realm and add a Client in the Clients section.
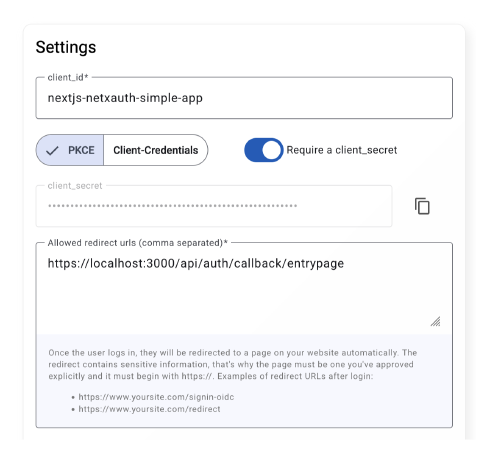
Now we can copy the client id and client secret from this page and replace the placeholders. The final piece of information is our Realm Uri and it is located on the top right corner of the Entrypage app. Clicking this link will take you to the well-known OpenID Connect configuration json document.
Page and layout
Next, a page that needs to work with a NextAuth session. Replace the demo code in app/page.tsx with the following:
'use client';

import { useSession, signIn, signOut } from "next-auth/react";

export default function Home() {
  const { data: session } = useSession();

  return (
    <div>
      {session ? (
        <>
          <h1>Welcome, {session.user?.name}</h1>
          <button onClick={() => signOut()}>Sign out</button>
        </>
      ) : (
        <>
          <h1>Not signed in</h1>
          <button onClick={() => signIn("entrypage")}>Sign in</button>
        </>
      )}
    </div>
  );
}
To provide this session functionality, we finally update the app/layout.tsx
'use client';

import "./globals.css";
import { SessionProvider } from "next-auth/react";

export default function RootLayout({
  children,
}: Readonly<{
  children: React.ReactNode;
}>) {
  return (
    <html lang="en">
      <body>
        <SessionProvider>{children}</SessionProvider>
      </body>
    </html>
  );
}
Run the dev server
Run the dev server on https (this is currently the only configuration supported by entrypage.io). If this is the first run, you will need to answer some questions regarding the self-signed certificates.
pnpm nextjs dev --experimental-https