Implementing Claims Transformation in .NET Core 10
This guide explains how to implement Claims Transformation in .NET Core to enrich user identity data dynamically.
When using OpenID Connect, once a user signs in, the authorization server issues an access_token to the client application, which then uses that token to authorize requests to API endpoints.
Tokens are opaque strings that are included in the requests to a website. These tokens are meant to be lightweight and contain only the standard claims defined by the OpenID Connect (OIDC) protocol. However, there are scenarios where standard claims are insufficient for fine-grained authorization.
Skip to: Implementing Claims Transformation with C# / .NET 10
Why Augment Claims?
To augment claims means changing the set of claims that was initially provided by the authorization-server.
While modifying or appending claims to an authentication context might seem counterintuitive at first, claims Transformation can have substantial benefits.
Claims Transformation addresses at least two challenges:
Claims Transformation May Reduce Coupling: By storing specific authorization attributes within the consuming system rather than the identity provider, you prevent domain-specific data from leaking into the global authorization service. This separation of concerns simplifies identity management and accelerates development cycles.
Claims Transformation Helps Preventing Token Bloat: Storing non-standard or large sets of metadata in the authorization server leads to oversized tokens. By omitting these details from the initial token and injecting them only when needed, you ensure the token remains compact and efficient for transport.
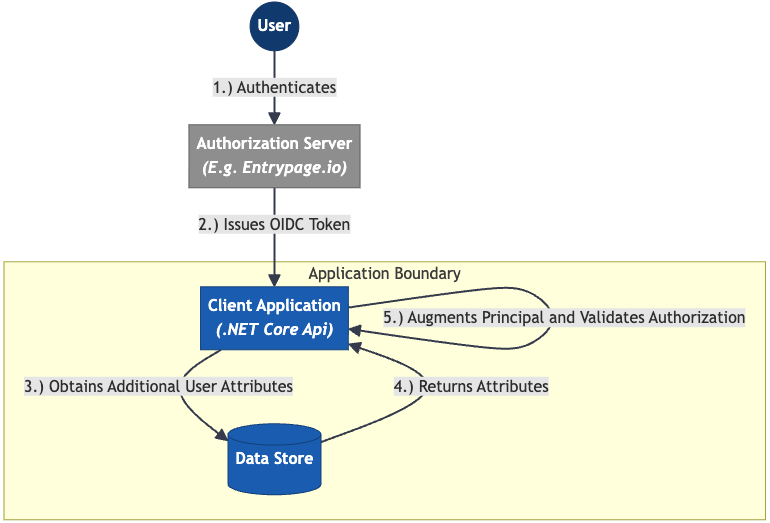
Architecture
The following diagram depicts the architecture of an application that implements Token Augmentation:
Components
Implementing claims transformation in a .NET Core Web App requires the following components:
- An authorization-server (e.g. Entrypage.io, KeyCloak, or OpenIdDict)
- A .NET Core Web Application
- A data store of any kind (e.g. Sql Server, Sqlite, or a flat file)
Implementing Claims Transformation with .NET 10
Building a .NET application that implements Claims Transformation requires:
- An instance of an OAuth2/OpenID Connect compatible authorization-server like Entrypage.io, Auth0, KeyCloak, OpenIdDict, and so forth. This demo uses Entrypage.io.
- The .NET 10 SDK
Creating the .NET Application
Create a new .NET Application:
dotnet new web

# Add the dependencies needed to authenticate the user
dotnet add package Microsoft.AspNetCore.Authentication.OAuth
dotnet add package Microsoft.AspNetCore.Authentication.OpenIdConnect
dotnet add package Microsoft.AspNetCore.Authentication.JwtBearer
Create a file called DepartmentClaimTransformer.cs, add the following code:
using System.Security.Claims;
using Microsoft.AspNetCore.Authentication;

namespace ClaimsTransformationDemo.Middleware;

public class DepartmentClaimTransformer(IRoleMapping roleMapping) : IClaimsTransformation
{
    public async Task<ClaimsPrincipal> TransformAsync(ClaimsPrincipal principal)
    {
        // Ensure user is authenticated
        var unAuthenticated = principal.Identity is not ClaimsIdentity { IsAuthenticated: true };
        if (unAuthenticated)
        {
            // Do not update the claims of an unauthenticated user
            return principal;
        }

        // Retrieve the roles of a user by their 'department' claim
        var departments = principal
            .FindAll("department")
            .Select(r => r.Value)
            .ToList();

        var roles = roleMapping
            .GetRoles(departments)
            .Where(role => !principal.HasClaim(ClaimTypes.Role, role)); // Avoid claim-duplication

        // Create a new ClaimsPrincipal object to append the claims to
        var clone = principal.Clone();
        if (clone.Identity is not ClaimsIdentity identity)
        {
            // If the authenticated user does not have a ClaimsPrincipal,
            // claims cannot be added.
            return principal;
        }

        // Add the claims and return the result.
        foreach (var role in roles)
        {
            identity.AddClaim(new Claim(ClaimTypes.Role, role));
        }

        return clone;
    }
}
In this example, we’re using the following data source:
public interface IRoleMapping
{
    /// <summary>
    /// Determines the roles of user based on their department
    /// </summary>
    /// <remarks>
    /// **Important:** Note that claims augmentation by using claims transformation middleware
    /// is only meant to be used to enrich claims without consulting external data sources.
    ///
    /// Claims transformation middleware is designed to potentially be executed multiple times
    /// during the processing of single request. This may result in potential, serious performance
    /// bottlenecks if used incorrectly.
    /// </remarks>
    /// <param name="departments">The departments the user works in</param>
    /// <returns>Their roles</returns>
    IList<string> GetRoles(List<string> departments);
}

public class RoleMapping : IRoleMapping
{
    public IList<string> GetRoles(List<string> departments)
    {
        var roles = new List<string>();

        if (departments.Contains("hair-dresser"))
        {
            roles.Add("haircut:read");
        }

        if (departments.Contains("customer-support"))
        {
            roles.Add("haircut:read");
            roles.Add("haircut:update");
        }

        return roles.Distinct().ToList();
    }
}
Wire the middleware in the .NET App
To get the claims transformation middleware to work, it must be registered in Program.cs:
var builder = WebApplication.CreateBuilder(args);

// Register the data source and the claims transformation middleware:
builder.Services.AddTransient<IClaimsTransformation, DepartmentClaimTransformer>();
builder.Services.AddSingleton<IRoleMapping, RoleMapping>();

// Todo: Configure authentication

// Todo: Configure authorization

var app = builder.Build();

// Todo: Configure authentication

// Todo: Configure authorization

app.Run();
Configuring the authorization-server
Next up: Configure an authorization-server. Theoretically, any authentication method is compatible with Claims Transformation in .NET. However, in this sample, we’re demonstrating how to configure it with an OAuth2-server: Entrypage.io.
- Spin-up an Entrypage.io instantly, register an account and create an API-key.
- Register the .NET website the user authenticates to. Typically:
http://localhost:5001. Important: Ensure the configured port matches your configuration.
Create a client using the Entrypage.io API:
# Create a scope that contains the claims needed in this demo
curl -X 'PUT' \
  'https://api.entrypage.io/v1/domain/[YOUR-DOMAIN.sandbox.entrypage.io]/scope/employee' \
  -H 'accept: */*' \
  -H 'Content-Type: application/json' \
  -H 'x-api-key: [YOUR-API-KEY]' \
  -d '{
  "accessTokenClaims": [
    "department"
  ],
  "idTokenClaims": [
    "department"
  ]
}'

# Create a test-user
curl -X 'POST' \
  'https://api.entrypage.io/v1/domain/[YOUR-DOMAIN.sandbox.entrypage.io]/user' \
  -H 'accept: text/plain' \
  -H 'Content-Type: application/json' \
  -H 'x-api-key: [YOUR-API-KEY]' \
  -d '{
  "preferred_username": "fred@yourdomain.io",
  "department": "hair-dresser"
}'

# Create the client
curl -X 'PUT' \
  'https://api.entrypage.io/v1/domain/[YOUR-DOMAIN.sandbox.entrypage.io]/client/claims-augmentation-test-app' \
  -H 'accept: text/plain' \
  -H 'x-api-key: [YOUR-API-KEY]' \
  -H 'Content-Type: application/json' \
  -d '{
  "clientType": "Confidential",
  "grantType": "AuthorizationCode",
  "scope": "openid profile employee",
  "redirectUris": [
    "http://localhost:5001/signin-oidc"
  ],
  "postSignOutRedirectUris": [
    "http://localhost:5001/signout-oidc"
  ],
  "allowLocalLogin": true
}'
The API-request to the /client endpoint responds with a client_secret:
{
  "clientSecret": "example:*IHd334T&^sdas$E%R^F7s5%76r57f^&6r*"
}
Copy the secret.
Configure the authorization-server in Program.cs
To configure the .NET application to user the authorization server you’ve just created, use the following code snippet:
    var builder = WebApplication.CreateBuilder(args);

    builder.Services.AddTransient<IClaimsTransformation, DepartmentClaimTransformer>();
    builder.Services.AddSingleton<IRoleMapping, RoleMapping>();

    // Todo: Configure authorization

    // Configure authentication:
    builder.Services
        .AddAuthentication(JwtBearerDefaults.AuthenticationScheme)
        .AddJwtBearer(o =>
        {
            o.Authority = "https://[YOUR-DOMAIN.sandbox.entrypage.io]";
            o.ClientId = "claims-augmentation-test-app";
            o.TokenValidationParameters = new TokenValidationParameters
            {
                ValidateIssuer = true,
                ValidateAudience = true,
                ValidateLifetime = true,
                ValidateIssuerSigningKey = true
            };
        });

    // Todo: Configure authorization

    var app = builder.Build();

    // Configure authentication:
    app.UseAuthentication();

    // Todo: Configure authorization

    app.Run();
This code bootstraps a .NET Core API where requests are authenticated by including an authorization: Bearer ****** header.
When implementing claims transformation in .NET Core, every request to an API endpoint invokes the transformation middleware. Therefore, it may be important to ensure that this middleware is highly performant.
While it is possible to use Claims Transformation in stateful .NET Web Applications, it is generally not recommended to do so. Unlike stateless APIs, a Web Application can maintain state; therefore, it is better practice to transform the user claims once during the initial authentication process rather than re-processing them on every subsequent request.
Implementing Authorization with .NET Policies
To validate user roles — or any other attributes — you can utilize the ASP.NET Core Authorization framework. It features a concept called Policies:
builder.Services.AddAuthorization(options =>
{
    // Utilize standard authentication methods (e.g. roles, claims, etc.)
    options.AddPolicy("RequireHairColorReadRole", policy => policy.RequireRole("haircolor:read"));

    // Or build a custom policy
    options.AddPolicy("MustHaveGoldenHair", policy =>
    {
        policy.AddRequirements(new HairColorRequirement("gold"));
    });
});
The following Minimal API endpoint demonstrates how to link a policy to an endpoint:
// Important: Bootstrap the authorization pipeline
app.AddAuthorization();

// Create an endpoint that requires authorization:
app
    .MapGet("/haircolor/{customerId}", (string customerId) => Results.Ok("Welcome."))
    .RequireAuthorization("RequireHairColorReadRole");
Custom Policies
When there’s a need to implement a more complex authorization rule than just verifying the existance of a claim, one can write a custom implementation of the IAuthorizationHandler interface:
using System.Security.Claims;
using Microsoft.AspNetCore.Authorization;

public record HairColorRequirement(string Color) : IAuthorizationRequirement;

public class HairColorAuthorizationHandler : AuthorizationHandler<HairColorRequirement>
{
    protected override Task HandleRequirementAsync(
        AuthorizationHandlerContext context,
        HairColorRequirement colorRequirement)
    {
        var hairColor = context.User.FindFirstValue("hair-color");

        if (!string.IsNullOrEmpty(hairColor)
            && hairColor.Equals(colorRequirement.Color, StringComparison.OrdinalIgnoreCase))
        {
            context.Succeed(colorRequirement);
        }

        return Task.CompletedTask;
    }
}
Registering the Policy and Handler
To use this custom logic, you must register both the handler and the policy in your Program.cs. This links the requirement to a specific policy name that you can use in your controllers.
var builder = WebApplication.CreateBuilder(args);

// Register the handler in the DI container
builder.Services.AddSingleton<IAuthorizationHandler, HairColorAuthorizationHandler>();

// Define a policy that uses the requirement
builder.Services.AddAuthorization(options =>
{
    options.AddPolicy("MustHaveGoldenHair", policy =>
        policy.AddRequirements(new HairColorRequirement("gold")));
});
Summary
Implementing Claims Transformation in .NET Core 10 is a practical way to keep your architecture clean and maintainable. By separating general identity from domain-specific authorization data, you ensure your infrastructure remains organized and your tokens stay lightweight.
Key takeaways from this guide:
Better Decoupling: Claims Transformation allows you to keep specific business logic out of your central Authorization Server. This prevents your identity provider from becoming cluttered with rules that only matter to one specific application.
Performance Considerations: Keep in mind that IClaimsTransformation runs on every request in stateless APIs. To avoid bottlenecks, ensure your transformation logic is efficient and avoid making heavy database calls during this process.
Preventing Token Bloat: By injecting metadata only when it is actually needed, you keep your JWTs small. This results in faster transport and less overhead for your network traffic.
Clear Authorization: Combining enriched claims with .NET Policies creates a readable and consistent way to manage access control across your entire project.
By following these steps, you create a .NET 10 environment that is secure, easy to explain to colleagues, and straightforward to maintain as your project requirements evolve.